 Click Here to download User Guide
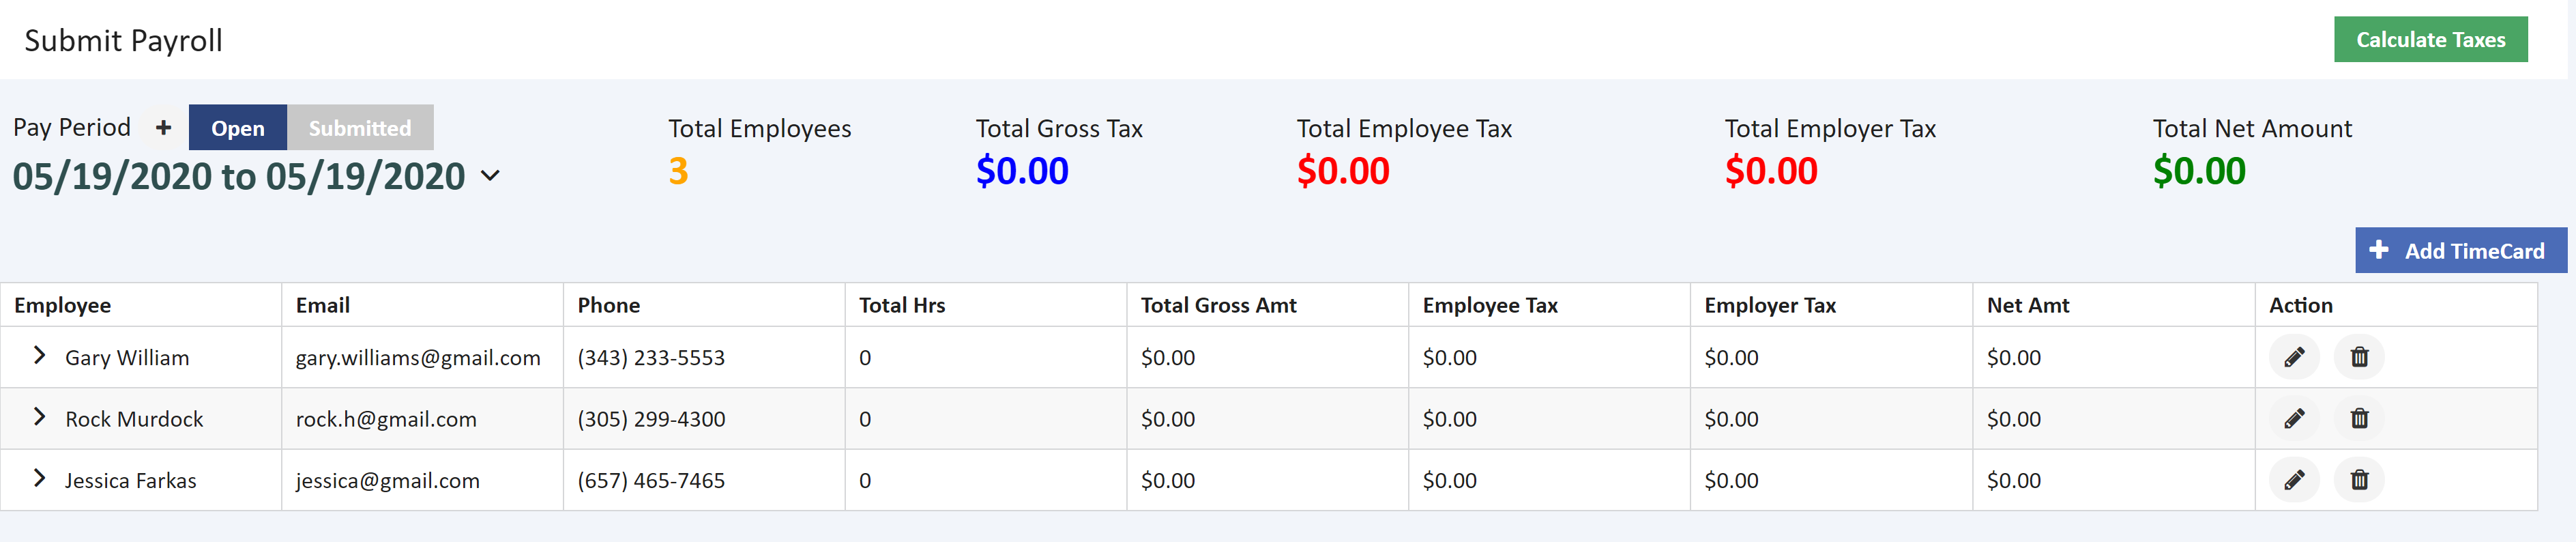
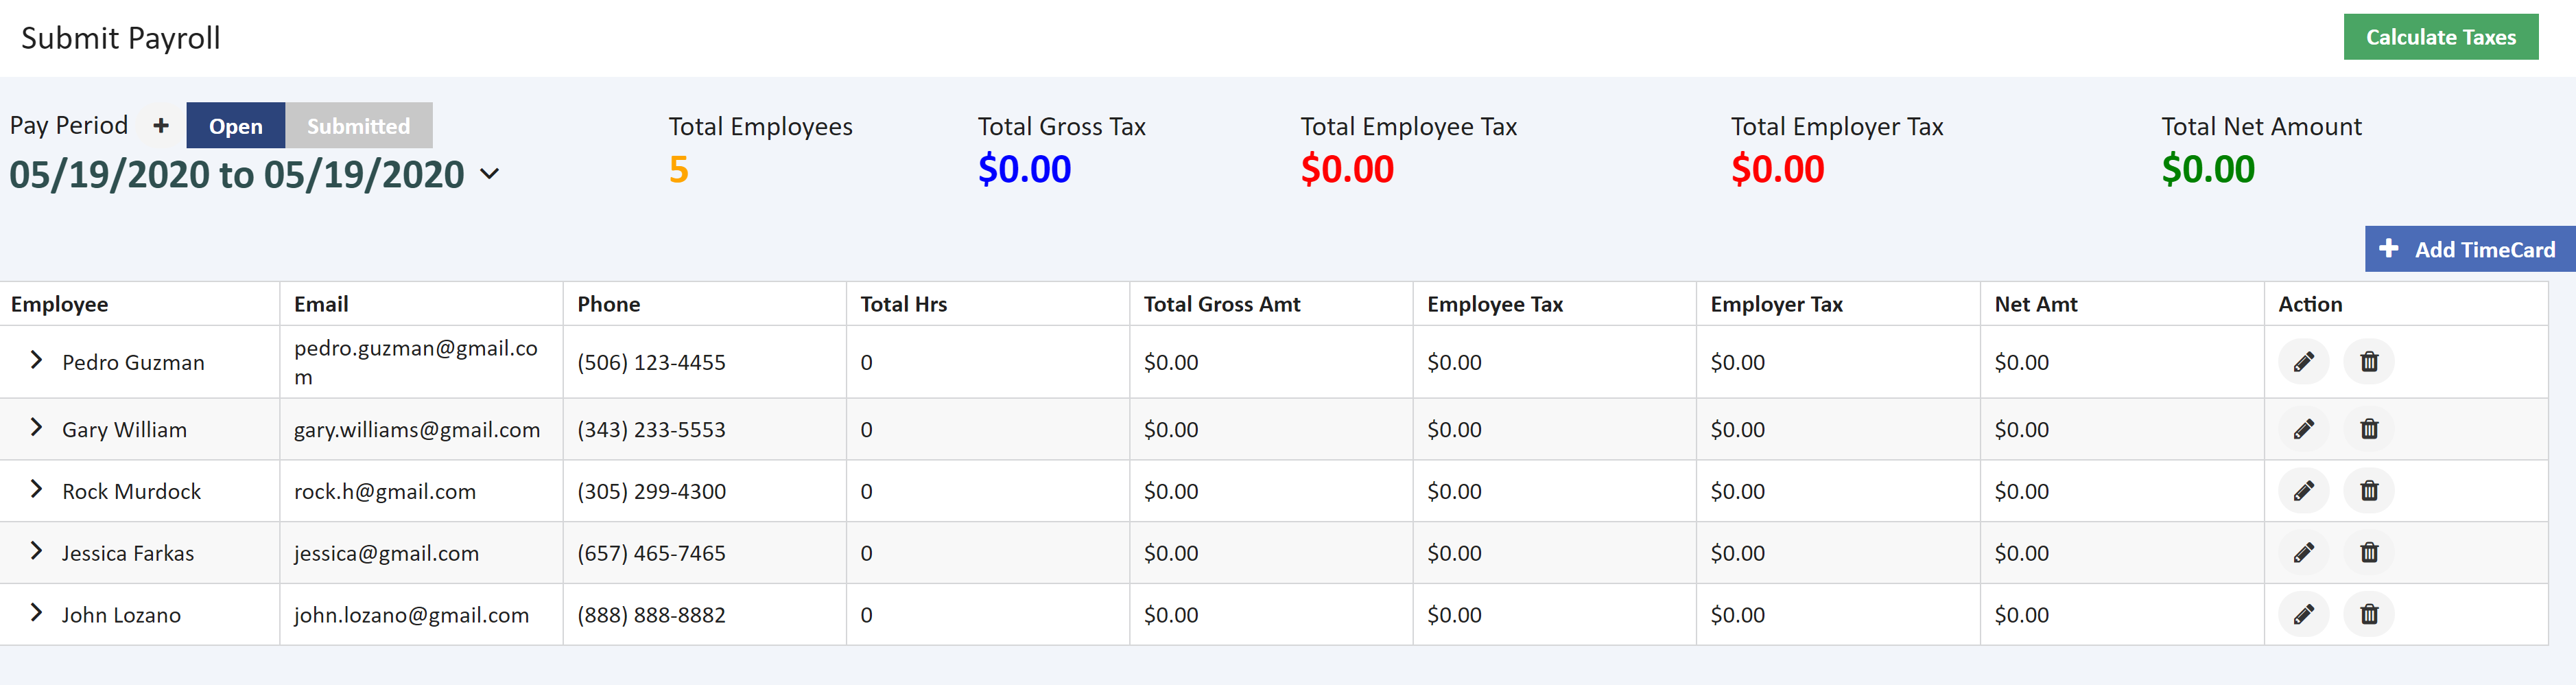
This screen is used to Add New Time card manually or import processed time card records from Time card Work sheet screen. This screen also provides the user an option to view the time card records for which the payroll is not submitted by clicking on Open button in the toggle switch and the Submitted button will display the list of submitted time sheet records for the payroll for the selected pay period. The following functions can be performed in this screen.
Add Time card records for Salary Employees
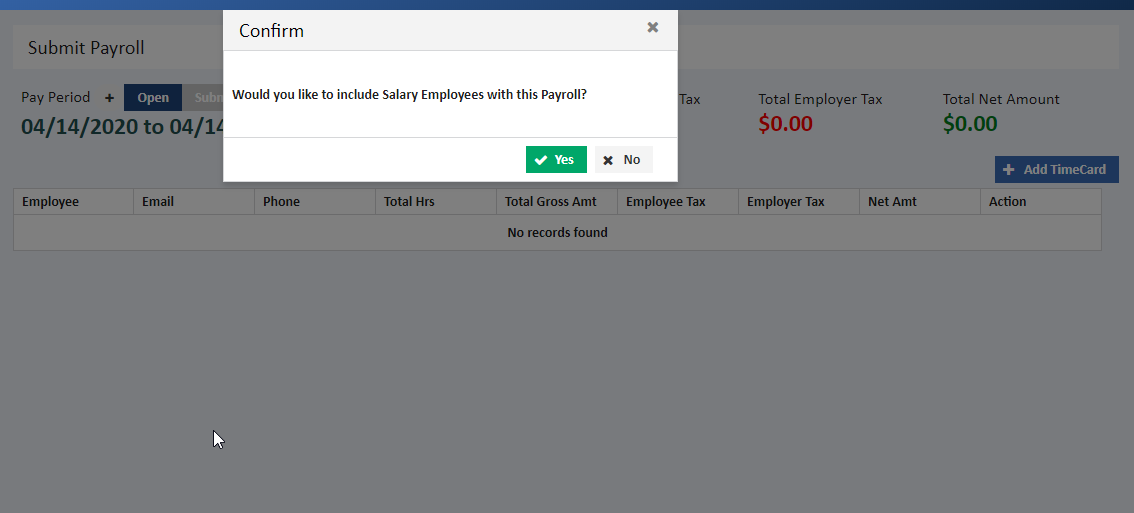
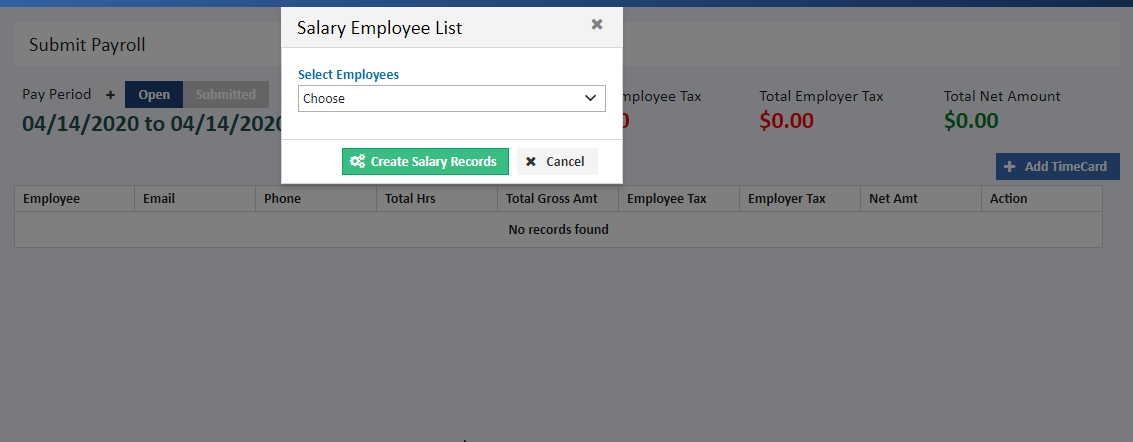
AccuBuild will scan the employee list for any employee set up with a pay method of Salary - No Hours or Salary - Fixed Hours. If any such employee is found, then the system will ask if you want to include the salaried employees in the payroll batch as soon as you open submit payroll screen or a new pay period is added in submit payroll screen. If answered 'Yes', then the system will display a pop up Select Employee List with a drop down, listing of all salaried employees (this does not include Salaried - Distributed Hours) so that you can choose which employees should be included in the batch. Once you have selected the employees to be included in the batch, click the Create Salary Records button and the system will automatically create the time card entries for you.
Timecard entries for salaried employees cannot be automatically added to a batch more than once. AccuBuild will only prompt to automatically add the timecard entries if the batch is new and there are no existing records found.
Add Time card for selected Pay Period
- The User can select a pay period from the already added pay periods using the drop down or add a new pay period using the +button next to pay period and Add Time card for the selected pay period using +Add Time card button.
- Enter the period beginning and ending dates. Only one set of payroll period dates may be selected for each batch of time card records. The union reports and the certified payroll reports are based on the week ending date so be sure to enter the proper dates.
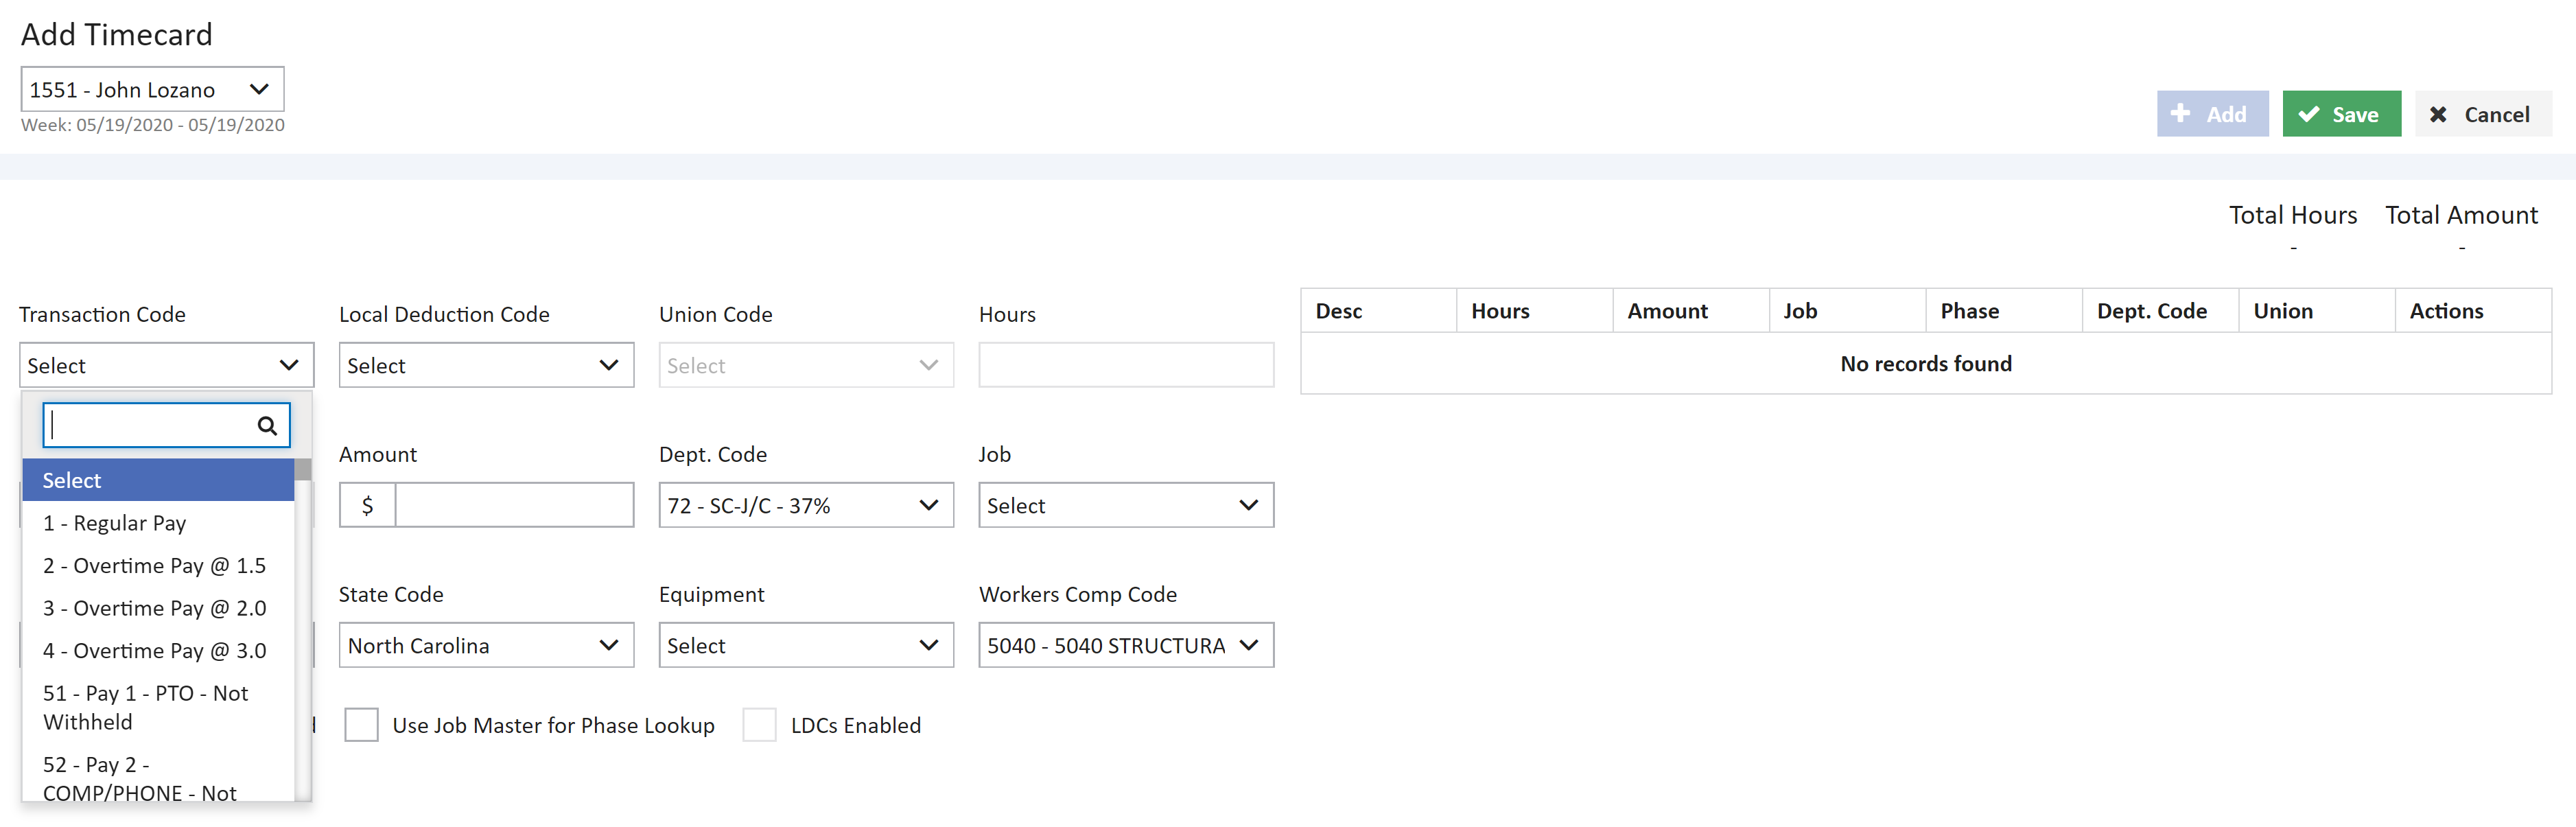
- Each employee's time is entered under a series of transaction codes, depending on the type of pay, and may be allocated to various departments, unions, workers comp insurance classifications, state codes, equipment codes, jobs and job cost phases. There is no limit as to the number of transactions that may be entered for each employee, therefore, your cost accounting may be as detailed as desired.Employee’s time card can be added using the below screen.
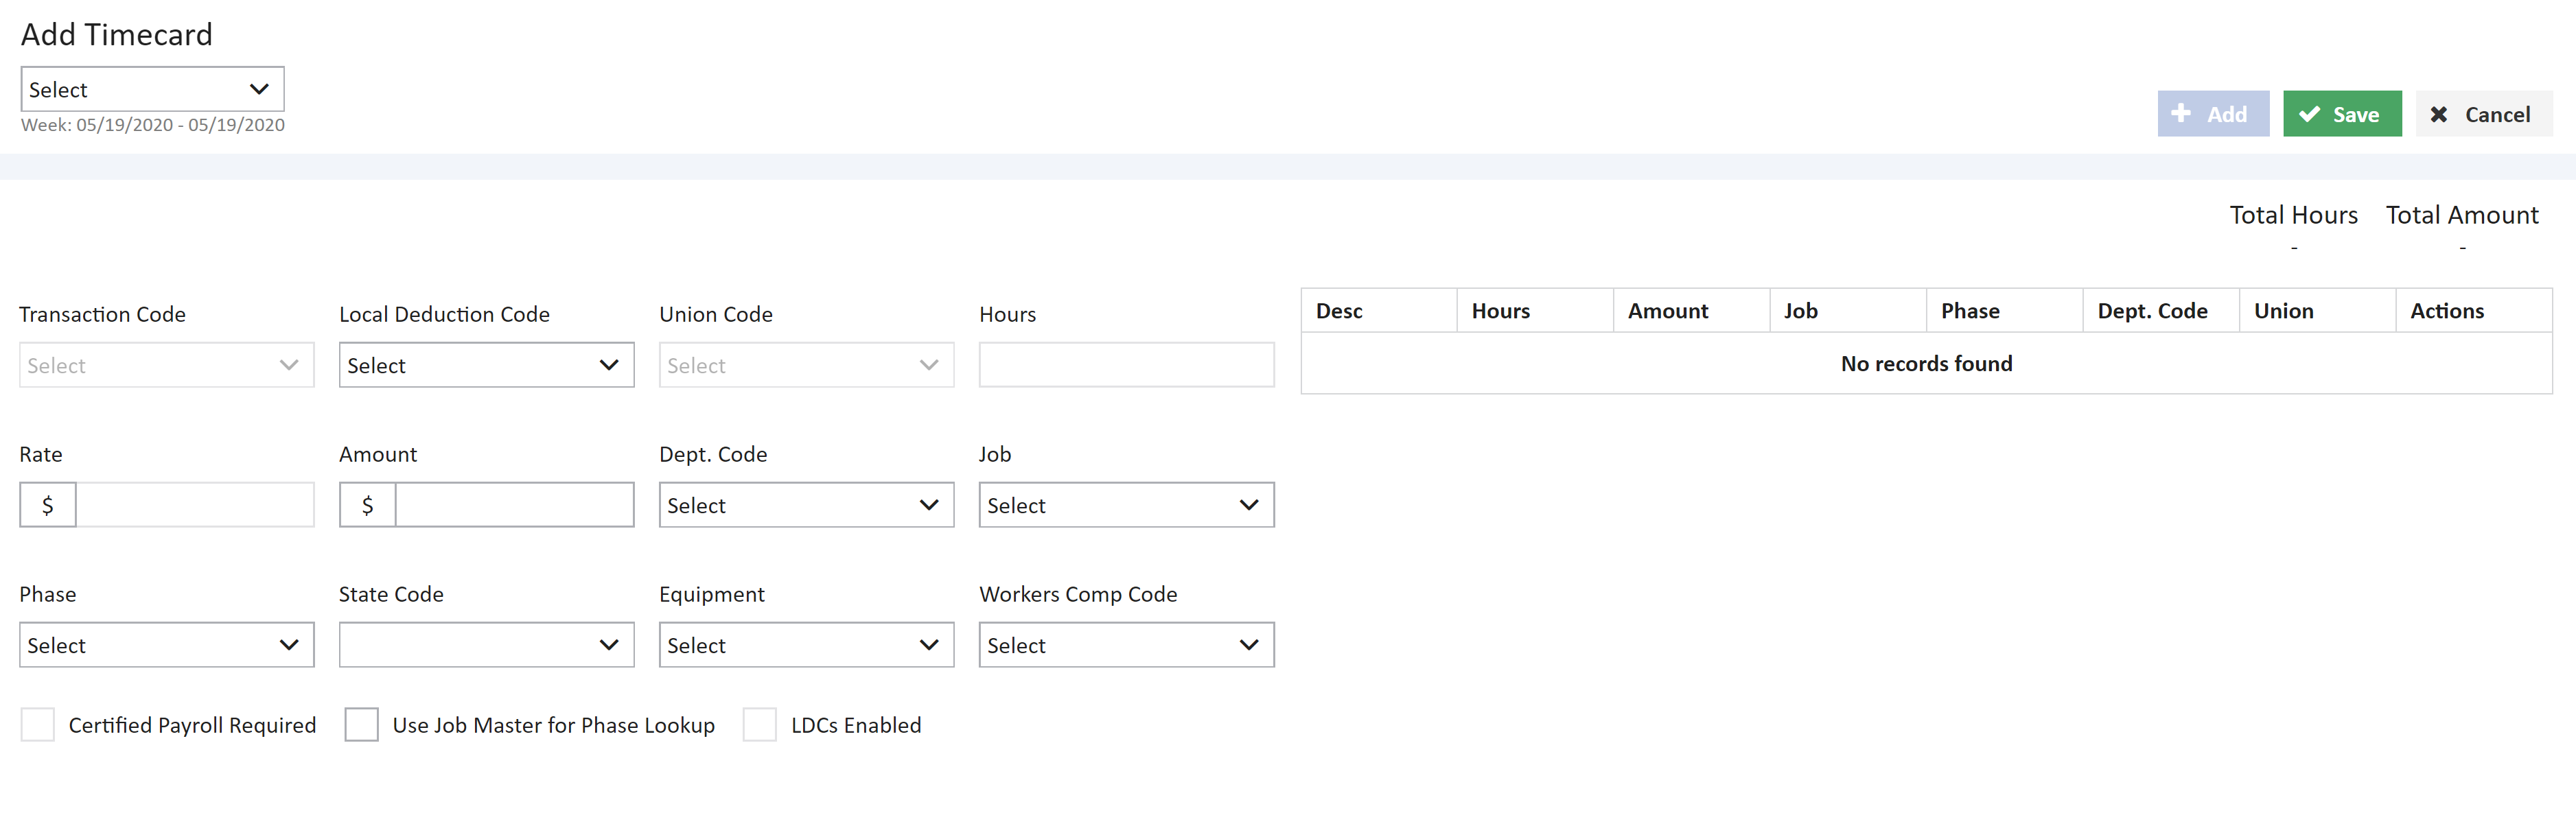
- When add time card is selected for a given pay period, the pay period displays by default and the employee for whom the time card needs to be add can be selected from the drop down on the top left corner of the screen.
- The first field of entry on the time card screen will depend on the employee's payment method i.e select the transaction code for that employee. If the employee has a pay type of Hourly, then select the code from the drop down list i.e 1 – Regular Pay which pulls the rate information from the employee's personal file. Please refer to the List of Payroll Transaction Codes for more information.
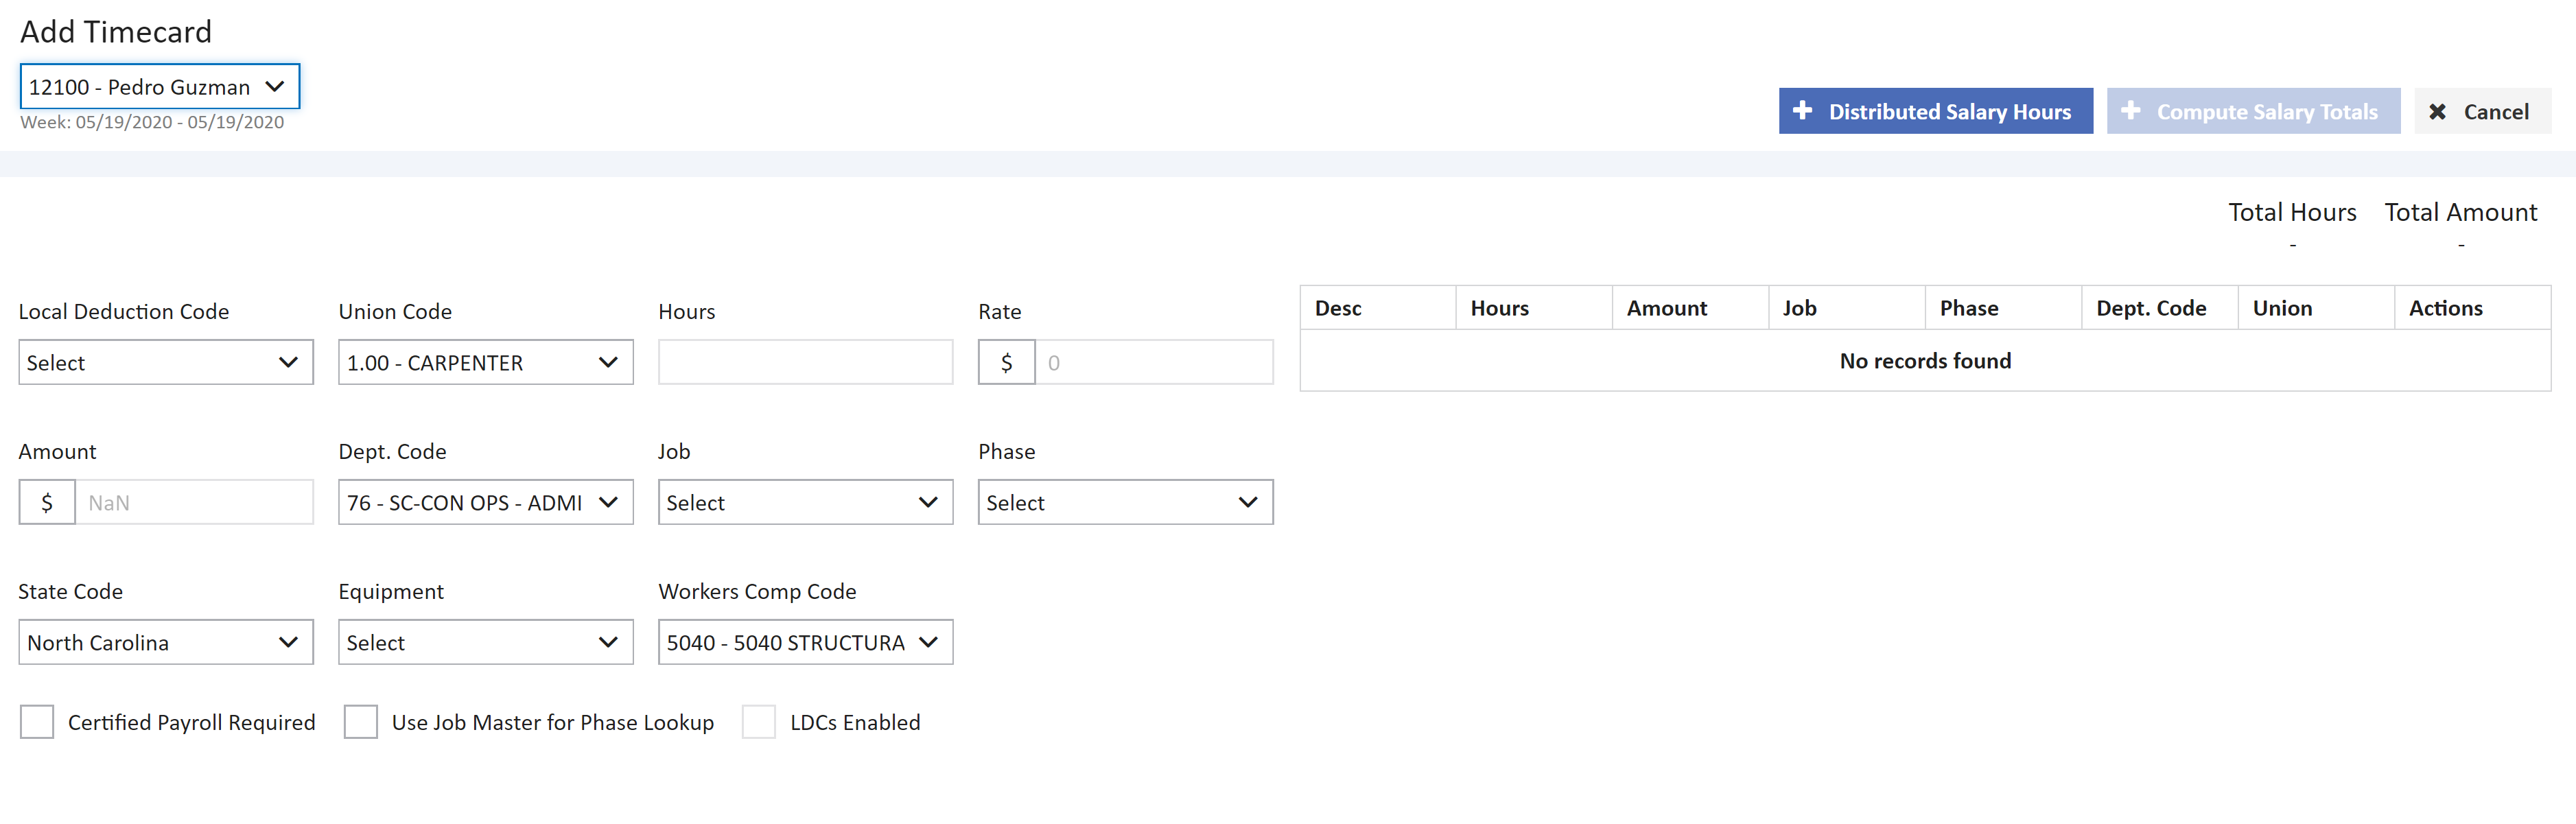
If the employee has been set up with a pay method of Salary - Distributed Hours, then the various allocations of the employee's hours must be entered first by clicking on + Distributed Salary Hours and then the Compute Salary Totals button must be selected. This calculation pro-rates the employee's total salary to the various jobs and/or other allocations based on the hours entered. This function will also automatically add any miscellaneous pays and deductions set up in the employee file to the time card entries. Additional entries may be added to the employee's time card.
If a Local Deduction Code needs to be entered manually, then it may be entered as a flat amount using transaction code 99. If the deduction is pre-tax, then be sure to use trans code 98 instead of 99; enter the amount as a flat amount. The Local Deduction Code field on this screen is only enabled when a Trans Code 98 or 99 is entered.
- Union Code - If the employee has a default Union Code in the employee file, then this union code will be displayed on the screen.
If you need to select another union code (or prevailing wage code) other than the union code set up in the employee's file, then you must use transcodes 21 through 24 to pull the rate and benefit information from the union table. Transcodes 121 - 124 will pull the same rates from the union table and will also pull the automatic pays and deductions from the employee file as well.
- Hours - Enter the hours worked for this transaction. This field will be automatically skipped if the transaction type is a 'flat amount deduction'. If you wish to enter a flat pay amount, then use a 'manual rate' type transaction (31, 32, 33, 34 or 41, 42, 43, 44) and skip the Hours field.
- Rate - If the selected transaction code is for regular or overtime pay based on either the employee file or union file, then AccuBuild will automatically update the Rate field with the rate found in the specified employee details > payment tab. If the transaction type is a 'manual rate' entry, then you may enter an amount in the field or skip the field to enter a flat amount.
- Amount - If the system automatically updated the rate field, then the Amount field is automatically calculated. If the transaction type is a 'flat amount' entry, then you must enter the amount in this field.
If the extended amount or the flat amount entered is zero, AccuBuild will ignore the entry and return to the transaction field.
- Dept.code - This field is not mandatory but it may be used to link a default job cost phase, workers comp code and the general ledger expense accounts to the timecard entry. If the timecard entry includes a union code, and the union code has been linked to a Department Code , then the Dept field will be automatically updated. If a union code is not entered, or if the union code has not been linked to a department code, then AccuBuild will look to the employee's file for a default department code.
If this timecard entry represents vacation pay, sick pay or holiday pay, then the department codes may be used to track these pay types.
Job - If the timecard transaction should be expensed to a job, then enter the appropriate job number in the Job field. All payroll burden expense calculated by the system for this transaction will also spread to the job. If the transaction should not be posted to a job, then the job field should be left blank.
The job field also functions as a flag for spreading the transaction to a certified payroll file so that certified payroll reports can be generated at a future time. A job must be designated as a certified job prior to beginning a payroll run and is added to the certified payroll job list by enabling the Certified Payroll Reports Required? option on the Project Management > Jobs on the payroll tab or enabling the flag in the bottom of the add timecard page.
- Phase - If a job number was entered, a phase (cost category) number must also be entered. The Use Job Master for Phase Lookup option may be enabled on the Controls > Global Settings > Company Info/Accounting option in order to force the payroll entries to be coded to only those phases that have been set up on the specified job. If this option is not enabled, then the timecard entry may be posted to any phase contained in the phase master file (a list of phases applicable to all jobs).
- Labor Distribution Codes - LDCs are coding rules that can be created based on the phase in order to prevent user entry errors. LDCs may include a specific workers comp code, union code, state code, and department code. If any LDCs have been created, then the LDCs Enabled check box on the time card screen will be checked (this box cannot be checked by the user). If a phase is entered on the time card screen that is linked to an LDC, then the time card entry will be updated with the linked values of the LDC which will override any other coding already entered including values that may be linked to the employee. (Refer to the 'Business Rules' documentation for more information). The fields that are associated with the LDC will be highlighted in yellow and will remain highlighted until the next transaction is entered.
- State Code - If the employee has multiple states and the timecard entry has been charged to a job, then the State Code field will default to the state code as set up in the job file but only if the employee's file has been set up with the same state code. Otherwise, the state code field will only display the states that have been set up in the employee's file. Be sure to select the proper state code for each entry so that taxes are calculated properly.
- Workers Comp Insurance Code - This field will default with a workers comp code based on the Workers Comp - System Rules which is documented in the Frequently Asked Questions section of the Payroll Manual. You may enter through this field by selecting from the drop down or leave ‘as is’. If this transaction is not subject to workers compensation insurance, then be sure to leave this field blank.
- Equipment - This field is used to charge maintenance time to a piece of equipment in order to keep a historical record of expenses. If the timecard transaction is not associated with a piece of equipment, then this field should be left blank.
-
The Equip field is only enabled if you have purchased the Equipment system.
- Certified Payroll Report Required - By default, every new job that is set up will also be set up for certified payroll reporting. This setting is reflected on the timecard screen by the check mark in the box labeled Certified Payroll Report Required. The transaction's hours are then entered in the Daily Hours Distribution area of the timecard screen. Note that the actual dates have been displayed below each day in case your payroll period is not a standard Sunday through Saturday period. Only hours that are charged to a job may be distributed in the daily hours fields. If the hours charged to a job should not be included in the certified payroll report, then uncheck the box.
The setup of certified payroll reporting may be removed from a job completely by disabling the option found on the Project Management > Jobs. This option can be re-enabled at any time, however, reports cannot be generated on payroll that has been already posted without the setting.
Save and Add new timecards
- Select Save to add the timecard transaction to the batch file. A recap of the transaction type, hours and gross amount will appear in the timecard entry along with any automatic pays and deducts associated with the entry. On the top of this, displays a total of the hours and the gross amount for all transactions entered in the current batch for the given employee.
- Once an entry is saved, the system automatically show +Add in anticipation of entering another timecard entry for the same employee. If there are more timecard transactions for the current employee, then repeat the above process until all of the current employee's transactions have been entered. If you have made an error in entering a timecard transaction, or if an automatic pay or deduction was erroneously pulled from the employee's file, then you must delete the particular record using delete icon under actions column and re-enter the transaction.
- Once all entries are correct, click on Close button to return to submit payroll screen. The timecard batch is now ready to begin the Calculate Taxes process, however, the entries may remain in the screen until you are ready to begin the process.
Calculate tax for added Time cards
- The Calculate Taxes option automatically calculates all payroll taxes for the user's current timecard batch based on a combination of the state codes for each transaction, individual withholding information, and tax rates and cutoff limits as set up through the Properties > Payroll option.
- The screen will display the current setting for the Payroll Period. This display is useful for companies that have to run multiple types of payroll, such as weekly for field employees and bi-weekly for office staff. The payroll period may only be changed in the Properties > Payroll > General screen.
- Select Calculate Tax to begin the tax calculations. When calculating taxes if there are any errors it will be displayed in the error log, else the tax will be calculated and total gross tax, total employee tax, total employer tax, total net amount will be displayed at the top of the screen.
- Once the tax calculation is completed the calculate taxes button will be replaced by Print Checks. Taxes may be re-calculated if corrections or additions to the time card batch file have been made.
Override Payroll Tax Calculation
If an employee has the Override Automatic Tax Calculation option enabled in the employee's file, then the system will display the tax information for the employee on a state by state basis. The Override Payroll Tax Calculations screen allows you to change the number of pay periods per year and/or change the tax amounts as well as the 'subject to' wage amounts for all of the federal and state taxes. The operator should use EXTREME CAUTION when using this feature of the software, as any changes to these taxes will affect the payroll check register and the quarterly payroll tax reports.
Print Checks
Once the payroll taxes have been calculated, the Print check option is enabled. On clicking Print Check, the user will be redirected to print check screen as shown below.
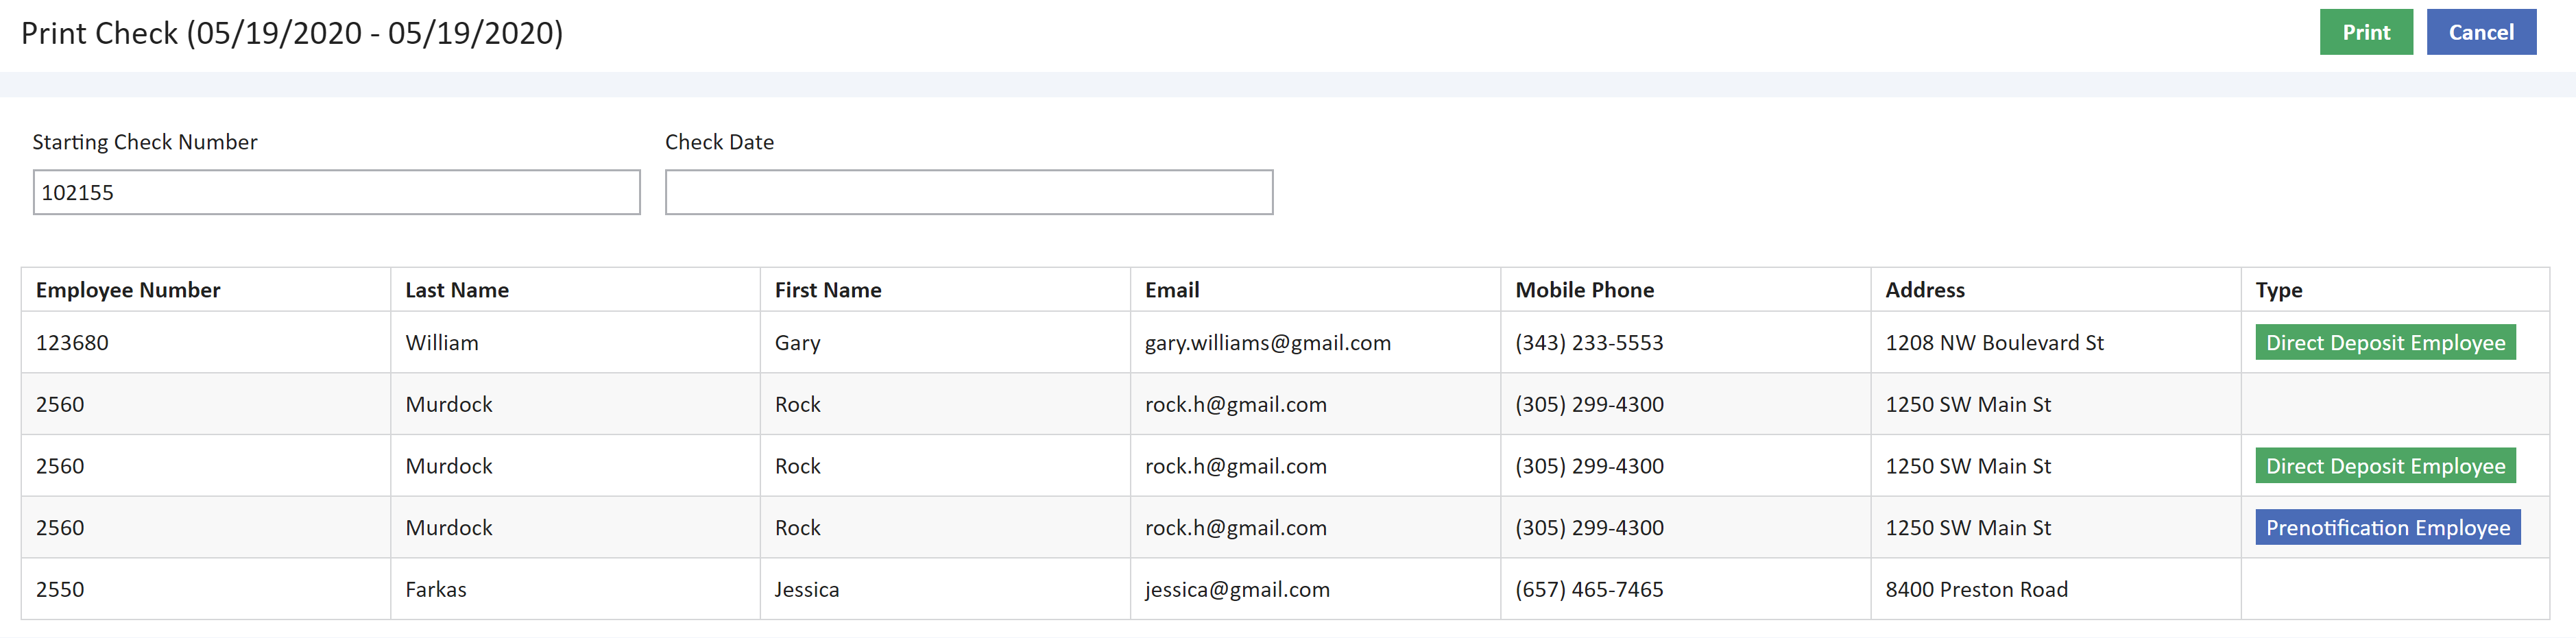
Enter the check date. This date is applicable to all checks, including direct deposits, within the batch.
Enter a starting check number. The system will default with the next available check number based on the last payroll batch that was posted but any value between 100 and 99,999,999 can be selected from the calendar popup.
If the Unique Check Number Sequence for Direct Deposit Checks option in the Payroll Properties is enabled (recommended), then the direct deposit items will be assigned a unique number starting with 700,000,000 but they will not be printed during this process. Please read the full documentation in the Properties > Payroll > General Tab section of this manual for complete information on this topic BEFORE attempting to print your checks the first time.
This screen shows the employee who are set up as direct employee, pre-notification employee. For example, if an employee's pre-notification record has already been transmitted to the bank, but the employee is still marked for pre-notification, you can cancel the check printing and change the employee setting so that the employee's check will be processed as a direct deposit check. If you need to make any changes to the employee settings for direct deposit payroll, simply click on the Cancel Button and make the desired changes in the employee's file and process again.
- Pre-notification Employee List – Employees on this list will still receive a printed paycheck until they are set up for direct deposit payroll. A pre-notification record will be created as a test record for these employees when the NACHA File is produced for the current payroll run.
- Direct Deposit Employee List – This types indicates employees who are currently set up for direct deposit payroll.
On clicking print the system will ask for a confirmation pop-up. On clicking ok, the checks will be generated. The checks can be printed using print PDF option.

Clicking on back button it brings back to submit payroll screen where we have the option to Reprint Checks. Preview option is used to view the pre check tax register report.
The automatic checks are printed with a control number that corresponds to the check number. The control number will be used as the check number when the data is spread through the system. Be sure these two numbers match before going on to the next step.
Submit Payroll
Once the payroll checks have been printed, submit option is enabled. When this option is selected, the timecard entries should be posted through the accounting system. At this point you may still add a pay period to return to the submit payroll screen. The last added pay period will be listed by default. Submitted Button next to pay period can be used to see the submitted timecard records for selected pay periods.
_637267308324409930.png)