 Click Here to download User Guide
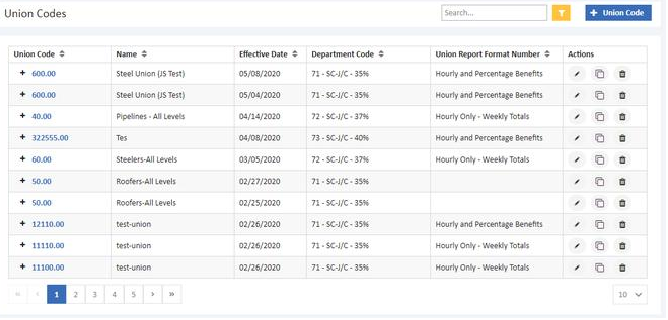
The Union Codes screen is used to maintain the various union or prevailing wage pay rates that will be utilized by your company. The union code file will keep a historical list of the union codes with their rates as of the rate effective date. This historical list will then enable you to print a single union report for any monthly period even when there has been a rate change during that reporting period. The following screen can reached by clicking on the Three dot icon on the top right > Controls > Union Codes
Create a New Union Code
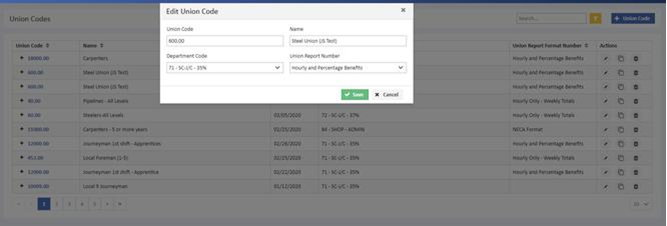
Select +Union Code button and enter the basic union code information to create a new union code.
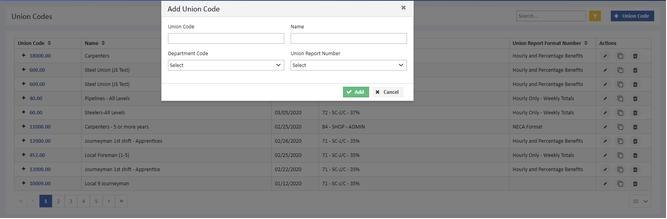
- Union Code - The union code is user defined and AccuBuild will allow up to 999 different numeric union codes with up to 99 different codes within each code (up to five digits plus two decimals: 1010.00, 1010.99, 20101.00, etc). The union codes should be assigned based on the union local or prevailing wage area.
- Name - The name of the union is also used as the employee classification description whenever a certified payroll report is printed.
- Department Code - Each union code may be optionally linked to a department code. Department codes are used to define the general ledger accounts and the job cost phase that will be used when posting the payroll expense.
- To Edit the Union Code, Click on the Edit icon under the Actions Column. The details of the Union Code can be edited in the Edit Union Code screen. Click on Save to save the changes.
- To Duplicate a Union Code, Click on the New Rates icon under the Actions column and click on Duplicate. In the New Union Rates screen, enter the Effective Date for New Rates and click OK. When the dialog screen is closed, the new codes will be available on the union codes screen.
- Any union code may be removed from the Payroll system by selecting the Delete button under the Actions column, but once a code has been removed, it will not appear in any union reports, and any reference made to it will be rejected by the system.
- To access the Pay/Ded Rates, Benefit Schedule and Certified Payroll click on the desired Union Code number from the list displayed.
![]()
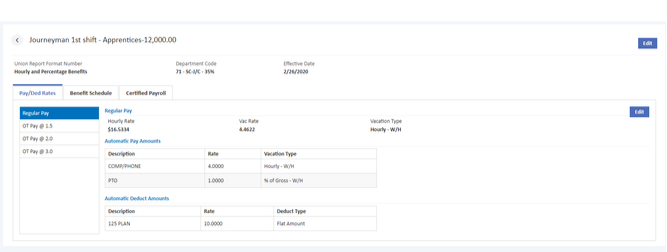
The Union Report Format Number, Department Code and Effective Date is shown above the tabs. The Union Code, Name, Union Report Format Number and Department Code can be changed using the Edit option.
Pay/Ded Rates Tab
-
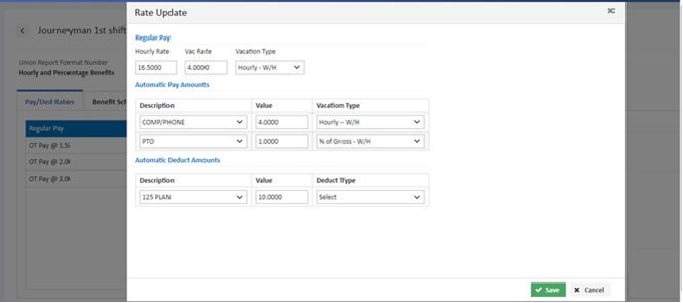
The Pay/Ded Rates Tab contains three tabs for the regular and overtime rates. Starting with the Regular Pay Tab, enter the rate information as follows:
|
Hourly Rate - Enter the base hourly rate to be paid to any employee linked to this union code. |
|
Master Codes (.00) - Unless you only have one classification of labor per union local or prevailing wage area, then the master code should not be set up with the base rate of pay (leave this amount as zero.) |
|
Child Codes (.01 - .99) - Enter the base hourly rate. Set the hourly rate to zero if you wish to pay different hourly rates to employees belonging to the same union (child) code. Each employee's hourly rate is then set up on the Employees screen. |
|
Vac Rate - Enter the vacation rate to be paid to any employee linked to this union code. If there is no vacation pay for employees belonging to this union, then this field may be skipped. |
|
Vacation Type - If a union pay is set up to be withheld, which means that it is paid on the check, taxed and then deducted from the check in order to pay the amount to a third party, then it is required that you have the corresponding deduction field available to hold the amount deducted. For example, if Misc Pay 1 is used as the 'Hourly - W/H' field, then Misc Ded 1 must be used to hold the deducted amount. Please take that into consideration when you are setting up your pay accumulators in the Edit > Rate Update screen. |
![]()
- Hourly – W/H: The miscellaneous pay amount will be computed at the hourly rate for each hour entered on the timecard screen for the employee. This amount will be added to the gross pay amount and then withheld from the check.
- % of Gross – W/H: The miscellaneous pay amount will be calculated as a percentage of gross pay for each timecard transaction entered for the employee and added to the gross pay amount. The amount will then be withheld from the check. Enter the percentage as a whole number (5% would be entered as '5.0000').
- Hourly – Not W/H: The miscellaneous pay amount will be computed at the hourly rate for each hour entered on the timecard screen for the employee. This amount will be added to the gross pay amount but will NOT be withheld from the check.
- % of Gross – Not W/H: The miscellaneous pay amount will be calculated as a percentage of gross pay for each timecard transaction entered for the employee and added to the gross pay amount. The amount will NOT be withheld from the check. Enter the percentage as a whole number (5% would be entered as '5.0000').
Pay Per Day
There are specific business rules that are required in order to use the 'pay per day' feature.
- Pay Per Day - Withheld - The flat amount will be added to the gross pay amount. The amount will then be withheld from the check. This option will require that you have the corresponding deduction field available to hold the deducted amount. For example, if Misc Pay 1 is used as the 'pay per day' field, then Misc Ded 1 must be used to hold the deducted amount.
- Pay per Day - Not W/H - The flat amount will be added to the gross pay amount. The amount will not be withheld from the check.
- These amounts MUST be set up on the Union Table and cannot be set up at the employee level.
- This type of pay will only work with transaction codes that pull the pay rates from the union table which include 21-24 and 121-124.
- These transaction codes are compatible with the Mobile Time Card entries.
- The pay amounts entered for these transactions must be entered to a job and certified by distributing the time for each day.
- Whenever any hours are detected on a day of the week, the automatic pay per day transaction will be created and, if multiple entries are made for the same day, only one pay per day transaction will be generated.
- Automatic Pay Amounts - The descriptions and taxable status of these fields are defined on the Payroll > Properties > Misc Pays/Deds Tab screen. Only the first three misc pay fields may be used for union pays.
- Automatic Deduct Amounts - The descriptions of these fields are defined on the Payroll > Properties > Misc Pays/Deds Tab screen. Only the first three misc deduction fields may be used for union deductions. These amounts will be deducted from the employee's check.
- Hourly - The deduction amount will be computed at the hourly rate for each hour entered on the timecard screen for the employee.
- % of Gross - The deduction will be calculated as a percentage of gross pay for each timecard transaction entered for the employee. Enter the percentage as a whole number (5% would be entered as "5.000").
- Pays that are withheld - If a union pay has been set up to be withheld, which means that it is paid on the check, taxed and then deducted from the check in order to pay the amount to a third party, then it is required that you have the corresponding deduction field available to hold the amount deducted. For example, if Misc Pay 1 is used as the 'Hourly - W/H' field, then Misc Ded 1 must be used to hold the deducted amount.
Do not enter the amount or rate to be deducted in this field; AccuBuild will do this for you.
Benefit Schedule Tab
The Benefit Schedule Tab is used to itemize the employee contributions and employer-paid benefits (union burden) such as health and welfare contributions, pension plan contributions, and apprenticeship training contributions, as required by the union. This schedule is then used in printing the monthly union reports and for pulling any union burden rates during the calculation of automatic payroll checks.
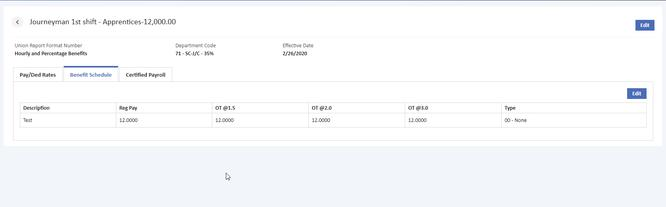
- The Pay/Deduct Rates Tab and the Benefit Schedule Tab both contain separate rate fields for regular pay and overtime pay. Set up of the union codes will be easier if you complete all of the regular rates on both tabs BEFORE you save the code. AccuBuild will then copy the regular rates to the overtime rate fields which can then be individually edited as needed.
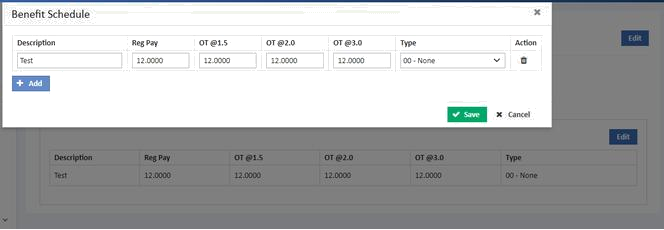
- A maximum of fifteen benefits may be itemized on this screen. The benefits should include both employee contributions as well as employer paid benefits.
|
Benefit Description - Enter the name of the union benefit. This description will appear on the monthly union report. |
|
Benefit Description - Enter the name of the union benefit. This description will appear on the monthly union report. |
|
Type - Select the pay type for the benefit item. The pay types may be based on an hourly rate, a percentage of gross wages, or on a flat amount per day, week or month. If the amount of the benefit item is paid by the employer, then it should be included with the payroll burden. AccuBuild will calculate the expense and post it with the other payroll burden to the job, and the liability will be accrued to the account as defined on the Ledger Interface of the Payroll > Properties screen. If the amount is paid by the employee as part of the hourly rate, or as a miscellaneous pay or deduction on the employee's check, then it should be listed as a benefit item but for report purposes only. Hourly or percentage benefits may be included as part of the payroll burden expense calculation. Flat amount benefits can not be included in the payroll burden calculation but will be included on the union report. A general journal entry can then be created to make an accrual for the flat amount benefits at the end of the month. |
Flat amount benefits for per day, per week and per month cannot have different rates for regular pay and overtime pay. Any flat amount entered in the overtime rate fields will be ignored and only the regular rate amount will be used to calculate the benefit.
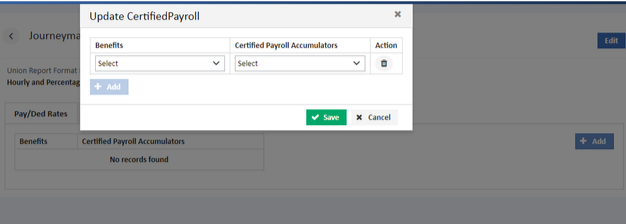
Certified Payroll Tab
Each benefit item may be linked to a certified payroll report description if you wish to include the benefit breakdown on the report. The 'Include Benefits' option of the certified payroll report displays ten user-defined headings that are first set up on the Certified Payroll Tab of the Payroll > Properties screen.
- If you are setting up a new union code and the system is in Add Mode, then select the desired heading from the Certified Payroll Accumulators drop down list to assign a benefit item to the certified payroll report. If you have already saved the code, then select Edit before attempting to link the benefits to the accumulators.
- Select the Add Button to add new benefits and certified payroll accumulators and click on save to save your records.